How to Overhaul a Bottom Bracket
How to disassemble, re-grease, reassemble and adjust a cup and cone bottom bracket.
Video updates
- 02:22 - IMPORTANT: Apply a thin layer of grease to the threads before inserting into the frame.
Today we’ll learn how to overhaul and re-grease an adjustable bottom bracket. To remove the cranks you’ll need a crank puller, a 17mm open end wrench and a large adjustable wrench. To overhaul the bottom bracket you’ll need a bottom bracket wrench or a pin spanner, a hooked lock ring wrench, and a 36mm wrench. For re-greasing the bearings you’ll need some cleaning solvent and waterproof grease, a rag, a toothbrush and a small container to clean the bearing cages.
Disassemble
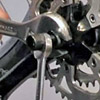
Begin by removing the cranks. Watch the cotterless crank removal tutorial for a more detailed procedure. Once the cranks are removed, loosen and remove the lock ring on the non-drive or left side of the bike by turning counter-clockwise. Once the lockring is removed you should be able to easily loosen and un-thread the bearing race using either a pin spanner or a bottom bracket wrench.
Now pull the spindle and both bearing cages out of the frame. It’s important to remember which way the spindle came out, as they are directional. The drive side usually has a longer distance from the bearing race to the end of the threads. Wipe off the bearing cages, drop them into the solvent, and let them soak while you use your rag to clean the spindle and both outer bearing races.
Tighten the drive-side bearing race by turning it counter-clockwise with your 36mm wrench. Unless you are replacing the bottom bracket, there is no need to remove it.
Inspect
Shine a flashlight into your bottom bracket shell to inspect the bearing race for pitting and wear. Inspect your other bearing race and then carefully inspect the spindle. Most wear occurs on the spindle’s bearing races. If you see pitting here you should take it to your local bike shop for a replacement.
Clean
Now clean both bearing cages with a toothbrush and solvent, and then set them aside to air-dry. These should also be replaced if they are worn or have bent cages.
Grease
Apply a layer of grease on both bearing races and cages. A grease gun makes it easy to squirt grease inside the gaps between the bearings. Then place the bearing cages into both races. The rounded side of the cage should be facing down into the bearing race. Seal them in with another layer of grease.
Reassemble
Now insert the spindle the same way you removed it. Wipe off any excess grease that comes out on the spindle. Grease the threads inside the bottom bracket shell, and then slide the outer race and bearing cage onto the spindle. Thread it on all the way clockwise but don’t tighten it. Again you’ll need to wipe off excess grease.
Adjust
Thread on the lock ring finger-tight. Before adjusting the bottom bracket, first install the drive-side crank arm and tighten it as shown in the crank installation tutorial. This will help us make a proper adjustment. Now hold the inner race firmly with your wrench or spanner and tighten the lock ring. When properly adjusted the spindle should spin smoothly. If it doesn’t, you’ll have to loosen the lock ring, back off the inner race a little bit, and then tighten it again.
Check for play by placing the crank arm close the frame and pushing and pulling it against the frame. There should be no movement. If it feels loose, you’ll have to loosen the lock ring, tighten the inner race a little bit, and then tighten the lock ring again. When the adjustment is correct, install and tighten the left crank arm and you’re done!
Related Links
Recommended Tools
- Park Tool Park HCW-11 Adjustable Cup Wrench
- Hozan C-205 Lockring Tool
- Super Lube White Grease Tube
- Finish Line Grease Gun
- Shimano TL-FC10 Crank Extractor
- Park Tool CCW-5 Crank Wrench
Categories
Discuss this topic in the Bicycle Repairs and Mechanics Forum
Pros & Cons of presta valve vs schrader valves
Latest post 2 hours agoA question I've wanted to ask for a while now. From a personal point of view, what have you found to be the positives and negatives of these two valves? What would your preference be?...
Read moreGrip Shifters
Latest post 2 hours agoCurrently renovating a child's bike. It has 24 inch wheels and is a suitable size for a 7-10 year old. Anyway it has grip shifters. it is a six speed with three chain rings on the front derailleur. On the rear derailleur the shifter does not appear to move the gear cable at all when shifting from 6 to 5 and 5 to 4. I am actually holding the cable with my finger and thumb against the cable cas...
Read moreLeft a bike outside on the balcony for couple of months. How to get rid of the rust?
Latest post 2 days agop6i6rfpm1ip41 (1).jpg (Size: 82.1 KB / Downloads: 530) Is there a way to get rid of that rust or do I need to replace certain components? More pics...
Read moreHow often check or change mechanical disc brakes
Latest post 2 days agoI'm curious—how often or after how many miles do people typically check or change their mechanical disc brake pads? I've been bikepacking for a while but never really followed a maintenance schedule. A few weeks ago, I took my bike to a mechanic because I heard some noise. The mechanic did a quick overhaul, and I was sent on my way. However, a few weeks later, while descending steep hills, I s...
Read more9 speed chain on 8 speed bike
Latest post 2 days agoAll of my bikes are 7 or 8 speed and sometime in the past I bought a 9 speed chain for some unremembered reason. is there any reason not to use it on an 8 speed bike?...
Read moreRusty chain inspite of cleaning,lubing
Latest post 5 days agoHello, I was going to ask this question in @Flowrider’s post, but since this is a slightly different issue, I decided to start a new post. https://forums.bikeride.com/thread-9267.html I’m nowhere near the ocean, so salt-related rusting isn’t a concern. I’m currently in the ninth month of a long bikepacking trip, and sometimes I stay in one place for a week or longer. During this week or ...
Read moreColnago restoration
Latest post 4 weeks agoHi everyone. A bit repetitive from my intro in GF, but this is the correct section for this post. I’m new to vintage bikes, but I’ve been eyeing a vintage Colnago to restore for a long time. Finally found one and the timing was right to pull the trigger. I’m still trying to identify the exact year, but from my research it’s 1991-1993 Colnago Super PiU. Mostly original, I think, apart from ...
Read moreColumbia 3 wheel differential
Latest post 1 month agoHello everyone and thank you so much for having me! I have an older Columbia 3 wheeler adult tricycle and she has a differential, somewhat like a car. I wanted to open up the differential for cleaning and oiling but cannot find any info on her, as to how much oil to add, and where the oil fill point is. Can anyone help me in this endeavor? I'd really love to get her going but don't want to ris...
Read moreFront derailer not moving
Latest post 1 month agoHi, I been upgrading my old bike with new brake and shift cables. I got my brakes working and now trying to get my shift cables working. I was able to install new shift cable, I made sure to hold the cable tight and tighten the Bolt to keep in place. But it doesn't move the derailer at all when shifting. I have a feeling it's a simple fix that I'm missing something. I thought it might be the new ...
Read moreWhat are the best cost effective ways to prevent chain rust?
Latest post 1 month agoI live 5 km from the ocean (not sure if that's relevant), and I pretty much only mountain bike. After every ride, I hose down and clean my bike. I wipe them down with a cloth. After a few days, the ones not ridden have what looks like surface rust appear on the chain. Do you have any cost-effective remedies to solve this issue?...
Read moreHow to deal with rusty chain
Latest post 1 month agoThe best thing is not to let your chain get rusty in the first place. Chains for most 6,7,8 speed bikes can be had for $15 to $20 all day long. For me my first choice is to just replace it and the reason is simple. If finished it does not meet the level of 95%+ perfect it will get replaced. If the chain you are trying to save does not have a quik link then that is an extra cost to figure...
Read moreRear v-brake repair
Latest post 2 months agoHi everyone, I'm new here and I've been trying to avoid taking my bike to a mechanic and save some money. I succesfully fixed my front but struggle with the rear, I got new brakes for the rear. I notice i think it might be the housing causing the noodle to be off centered and making the left brake pad to close to the rim. Any help would be greatly appreciated, thanks!! My next project is to attemp...
Read moreCustom Bike part manufacturing
Latest post 3 months agoHello, Not sure if I should post this in buying advice or repairs, but here we are. I recently bought Schwinn cruiser an old one and I can't find the rear dropout bracket replacement. So I decided to try out a custom bike part manufacturer. Still waiting for my part, so if anyone has tried out a custom on demand manufacturer, please share your experience....
Read moreRemoving and refitting rear wheel on belt drive bike?
Latest post 3 months agoI have a Gazelle Esprit belt drive bike with hub gears which has a rear puncture. Can someone advise me on how to remove and refit the wheel? I'm aware that it can be quite complicated, but I have no option other than tackling it myself. The photos were taken with the bike upside down. IMG_20250122_105320.jpg (Size: 77.51 KB / Downloads: 98) IMG_20250122_105428.jpg (...
Read moreBest way to thoroughly clean a chain?
Latest post 4 months agoHi everyone! I hope you're enjoying a great start to 2023. I'm curious to hear your go-to method for getting a chain truly clean. I don't mean, just looks shiny or is good enough for a quick clean after a ride. I want to know what you do when you want to get every last morsel of ground-up, link-destroying, roller-eating, tooth-gnashing crud out of your chain. The Best Chain-Cleaning Recipe Ever?...
Read more