How to Overhaul a Jockey Wheel
Removal, lubrication and installation of a standard jockey (pulley) wheel.
In this tutorial we’ll learn how to overhaul a standard jockey wheel (pulley wheel) on your rear derailleur. In a future tutorial we’ll cover the sealed cartridge bearing style found on higher end derailleurs.
Tools
For this job you’ll typically need a 2.5 or 3mm allen key. Some older models have a nutted bolt requiring a metric wrench. You’ll also need a rag and some waterproof grease.
Pulley Removal
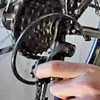
First you’ll want to remove the chain from the front chainring to give it some slack. You don’t need to remove the rear derailleur or cable for this job, but I will for this video so we can see things a bit better.
It is important to note that the upper and lower pulley wheels are different, so they should be overhauled one at a time to avoid a mix-up. The upper wheel will often have a thicker profile.
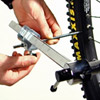
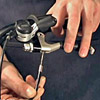
Remove the jockey wheel’s bolt by unthreading the bolt counter-clockwise. Once the bolt is removed, the jockey wheel will slide out of the derailleur cage. There will be a cupped washer facing inward on either side. Remove these and then pull the bushing sleeve out from the center.
Cleaning
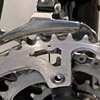
Now wipe all parts clean with a dry rag. You can use a little cleaning solvent if needed. Inspect the teeth on the jockey wheel. These ones are in good shape. If yours are broken or badly worn they will need replacing.
Lubrication & Installation
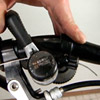
Before reinstalling, apply some grease to the bolt, bushing sleeve, and inside of the pulley wheel. Then slide the bushing back into the wheel and hold the cupped washers in place on either side while you place the wheel back into the derailleur cage. Then tighten the bolt to the specified torque: usually around 3 Newton Meters or 20 inch pounds.
Repeat the process as needed for the other jockey wheel. If for some reason both wheels are removed and the inner cage plate has come off, remember that the larger end of the cage plate always attaches to the lower pulley wheel.
Related Links
Recommended Tools
- Park Tool AWS-10 Folding Hex Wrench Set
- Park Tool HXS-1.2 Hex Wrench Set
- Super Lube White Grease Canister
- Park Tool Wrench Combo Set
- Park Tool SK-3 Starter Mechanic Tool Kit
- Park Tool PK-3 Professional Tool Kit
Categories
Discuss this topic in the Bicycle Repairs and Mechanics Forum
Pros & Cons of presta valve vs schrader valves
Latest post 1 day agoA question I've wanted to ask for a while now. From a personal point of view, what have you found to be the positives and negatives of these two valves? What would your preference be?...
Read moresuspicious broken part after service--is this legit?
Latest post 4 days agoHey all, I'd love some feedback on a repair issue. I just got the brakes bled and the first ride after was fine. But after one week of sitting idle, I took it out and the rear brake was suddenly making a horrible loud screeching noise when applied. Took it back to the shop and the mechanic showed how the two halves of the brake were not perfectly aligned and holding firm and there was oil leakage....
Read more70's=80's Free Spirit Blaze MTN
Latest post 6 days ago70's-80's Free Spirit Blaze MTN 2.JPG (Size: 21.86 KB / Downloads: 4) 3.JPG (Size: 33.89 KB / Downloads: 4) DSCN3722.JPG (Size: 32.65 KB / Downloads: 4) 4.JPG (Size: 56.63 KB / Downloads: 4) I need a front index shift lever or the matched set. Falcon derailleur, 10 speed or whatever is compatible. 7.3mm is the closet spacing measurement...
Read moreFront Disc screeching/vibration .. help please :-)
Latest post 1 week agoFront Disc brake(Shimano) makes dreadful noise/vibration just at the ‘bite’ point where it stop the wheel (final 2 or 3 cms of rotation on the rotor ! Only started a month ago No luck in sorting it ! .. have had pads, rotor and caliper all replaced and it makes very little difference (all are clean, aligned and functioning as they should) Absolutely no problem on the rear. Don’t know wh...
Read more2nd hand rad rover repair help needed
Latest post 2 weeks agoSo I bought this second hand rad rover five power bike it worked for the whole day and the end of the day I thought it died on me but it hasn't been able to start back up please contact me if you think you could help I've done some research and I have no idea what I'm doing I just need some help somebody knows what they're doing to guide me with this please I spent all my money on this I don't hav...
Read moreAxle keeps slipping on applying force/climbing hills..
Latest post 4 weeks agoMy friend is having this issue where the axle keeps slipping in the rear dropouts and hit the chain stay on the non-drive side. IMG-20260418-WA0021.jpg (Size: 82.12 KB / Downloads: 66) This usually happens when a lot of force (climbing on a high gear or standing to sprint) is applied. It’s worse when the bicycle is loaded up with camping gear on the rear rack. Things tried th...
Read moreNeed help with Drivetrain Update
Latest post 2 months agoHello everyone, I'm an older lifelong cyclist that recently had my beloved old yeti mountain bike stolen, and to try and fill that void, I picked up a 2015 Specialized Crosstrail (I'm riding more paved and gravel trails these days, my full-on mountain bike days are over!). The bike was in very good physical condition, apparently very lightly used. I was unable to ride before purchase, but it looke...
Read moreVelowave Ranger break change question
Latest post 2 months agoHello! I tried to change my Velowave ranger e-bike breaks and the lever would not have traction. I researched and learned I needed to bleed the breaks, I tried the top method with the cup with a break bleeding kit. Still had the same issue, I tried to use the syringe at the caliper but the hole was too small for any of the included adapters. Is it just trapped air in the calipers/line that is ca...
Read moreEye to Eye Shock Lengths
Latest post 3 months agoWill my conversion work? I have an old 2014 Giant Trance 1. It is a small frame. It is just a backup bike. It is still fun to ride and works well when a friend is or family member is visiting and bikeless. I hate sending things to the land fill or not being able to keep them repaired and running. I already replaced the fork a couple of years ago. I already found some parts and converted to a ...
Read moreShimano law suit
Latest post 3 months agoRemember the Shimano law suit? Fortunately I had the"good model series" Thousands of riders trusted these components without a second thought. Now, the story has taken a serious turn. Shimano has agreed to pay an $11.5 million penalty after US regulators found the company failed to report a major defect in its 11 speed road cranksets on time. According to the CPSC, Shimano had received thou...
Read moreQuestion regarding rear hub replacement for possible out of production bike?
Latest post 3 months agoHi there, I have a question in regards to either finding a replacement hub for my rear Mountain Bike or just replacing the whole wheel entirely. However when I went to a local bicycle shop (in China, that is so there are language barriers to keep in mind), upon inspection they claimed that the bicycle was too old to accept the replacement of their modern parts, which I honestly find hard to believ...
Read moreNeed suntour derailleur replacement
Latest post 4 months agoMy sensation crossroads cruz needs a rear derailleur. I need to verify which shimano part and shifter will work. Thanks Bob...
Read moreInner side tube punctures
Latest post 4 months agoI haven't been riding a bike for about two years, before that I was riding it extensively for about 5 or more years. It is a 26 inch mountain bike (if that matters at all). The bike was just staying on flat tires for these two years. After i decided to put the bike to life again so to speak I started to get inner tube punctures (punctures on a tube from the inner side, the side not facing the road...
Read moreHow to adjust shock preload?
Latest post 4 months agoThese are Noleen NR-1 shocks on an old Girvin ProFlex MTB. How do I get a grip on the preload adjuster? There is very little surface area & there are no notches for a typical spanner & a pipe wrench, vice grips, etc. which are sure to mar the springs if I can even get them in there to grip it. The working space on the fork shock is especially tight. See attachment photos. Thanks! ...
Read moreSRAM rival axs index Q
Latest post 5 months agoHi there, I recently bought some new wheels for my brand new specialized sl8 expert which runs sram rival axs. Everything is great except gear 12 (smallest cog) is now rejected (red and green LED flashes) in large ring. All other gears run fine. I notice as well that in the large ring it allows me to be in gear 1 which is cross chain? Is that normal? Any ideas what I need to do? Is it a limit sc...
Read more